Restore the console
Restore the console from a console backup, on a new host after the loss of the console host or in place, and check the servers and services.
A restore returns the console to the state of a console backup. Servers keep their mesh identities and overlay addresses. Database services do not roll back.
| Case | How |
|---|---|
| The console host is lost, or the console does not start | Restore on a new host with the installer. The same steps restore over a damaged console on the same host. |
| The console runs, and you want an earlier state | Restore in place in the console |
While the console is down, a server that restarts cannot join the mesh (see Console outage). Restore the console soon.
Be ready before a failure
- Set up console backups with an S3 target off the console host. Keep the recovery key file off the console host too. Without it, nobody can open a backup.
- Use a DNS name in
TSE_PUBLIC_URL. A restore on a new host is then a DNS change. - Keep a standby Linux host with Docker outside the failure domain of your services (see Requirements). On an airgapped site, keep the airgapped package of the console release on it.
What you need
- The backup: the newest
.tsefile of this console (tse-console-<console>-<time>-<release>.tse), as a local file. While the console runs, select Download on it in Administration → Console backups. Else get it from the backup directory (TSE_BACKUP_DIR) or from the S3 bucket. - The recovery key file of the backup
(
tse-recovery-key-<console>-<date>.txt). After a key rotation, an older backup needs the older key file. - The installer of the release of the backup, or of a newer release.
Restore on a new host
Stop the old console
The old console must never run again: two consoles with the same mesh
keys both claim the servers. Power off the old host, and prevent its
start or its connection to the servers. Or select Uninstall in the
installer menu on the old host (see Uninstall).
Uninstall removes the console volumes and .env.
If you cannot keep the old console isolated, stop here.
For a restore over a damaged console on the same host, skip this step.
Copy the files to the new host
Copy the backup file and the key file to the new host. Make the key file
readable only by you (chmod 600).
Select Restore the console from a backup
On the new host, run the installer:
curl -fsSL https://enterprise.tigerdata.com/install/timescale-enterprise.sh | shFrom a bundle, run ./timescale-enterprise.sh in the bundle directory.
In the menu, select Restore the console from a backup. At
Console backup file:, enter the path of the .tse file.
To restore without the menu, add --restore FILE after sh -s -- (or
after ./timescale-enterprise.sh). Add
--offline on a host with no internet access. To use an install
directory other than /opt/tse, add --dir (see
Install directory).
Give the recovery key file
At Recovery key file:, enter the path of the key file. With no
terminal, set TSE_INSTALL_RESTORE_KEY_FILE to the path.
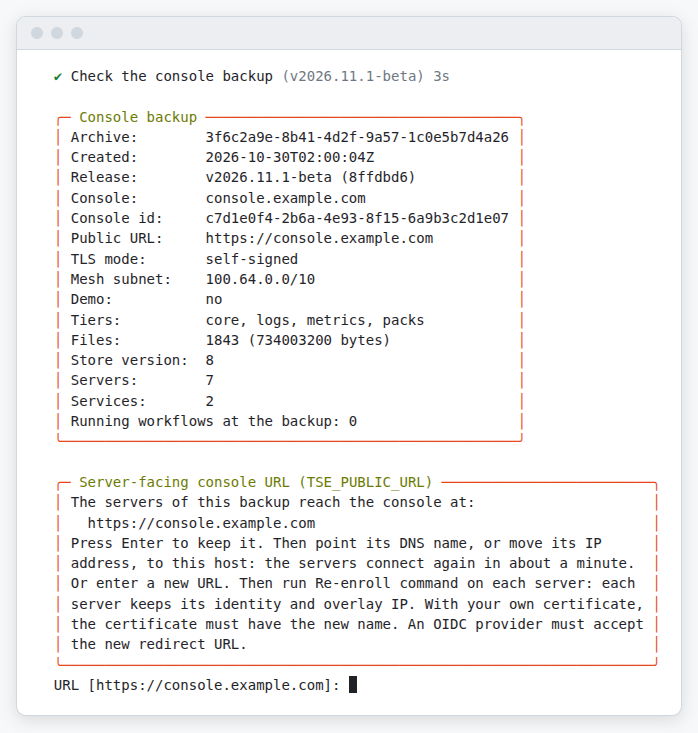
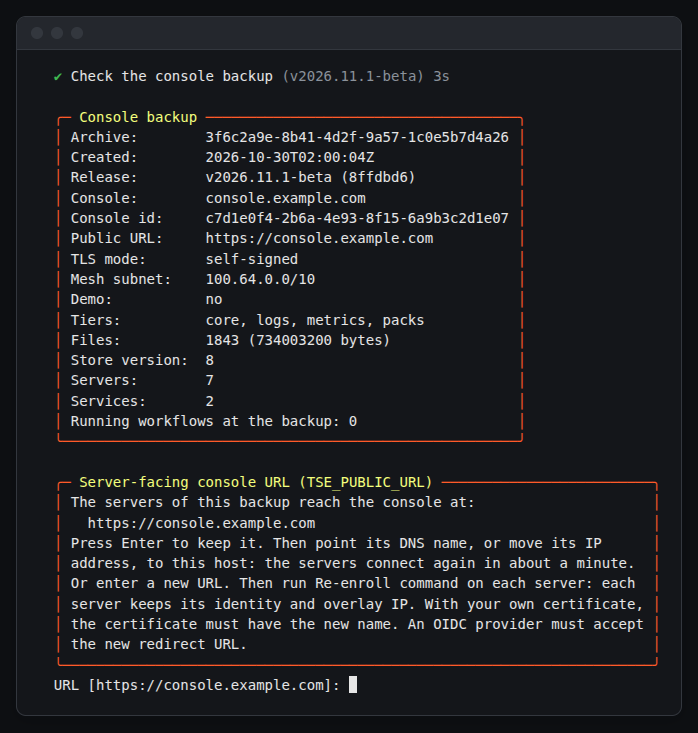
Check the summary
The Console backup box shows the backup time (Created), the
release, the console, the tiers, and the number of servers and services.
The installer stops and changes nothing when:
- the key does not open the backup;
- a file of the backup is changed or missing;
- the backup is of a newer release than the installer;
- the backup is of a demo and you did not add
--demo(on the host of its demo servers), or the reverse.
Correct the cause and run the installer again.
Keep or change the server-facing URL
At URL [<URL of the backup>]:, press Enter to keep the URL, or enter a
new URL. With no terminal, TSE_INSTALL_PUBLIC_URL sets a new URL. See
The console address for what each choice needs.
Let the installer check for the old console
If the old console answers at <URL of the backup>/api/v1/info, the
installer stops. Stop the old console first. Add --force to skip this
check only when you are sure that the old console cannot run again.
Wait for the console
On a new host, the installer asks for the
backup directory (TSE_BACKUP_DIR). Over a
console on this host, it first backs up that console to
<TSE_BACKUP_DIR>/pre-restore/. If that backup fails, it starts that
console again and stops (for a damaged console, see
Console outage, step 5). At the
end, it shows After the restore.
If the installer stops, run it again. It continues the restore.
Log in
Make the changes in The console address, then
log in with the users, single sign-on and TSE_AUTH_TOKEN of the backup.
Complete After the restore before other changes.
The console address
Each server finds the console at the host of TSE_PUBLIC_URL, on port
8090.
| Case | What happens | What you do |
|---|---|---|
| Restore in place, on the same host | Nothing changes. | Nothing. |
New host, TSE_PUBLIC_URL is a DNS name |
The servers connect again about one minute after the DNS change. | Point the DNS record to the new host. Open 8090/tcp, 41641/udp, 3478/udp and the console ports to the new host. |
| New host with the IP address of the old host | As for a DNS name. | Move the address to the new host. |
New host with a new IP address, and TSE_PUBLIC_URL is an IP address |
The servers cannot reach the console. | Keep the old address on the new host (a second address, or a forward of 8090/tcp, 41641/udp and 3478/udp). Or set a new URL and run Re-enroll command on each server. |
For a new URL, follow the server steps in Change IP addresses. The installer already set the URL: skip the URL change and restart there.
When the host name changes, a certificate in ./certs (provided mode)
must have the new name. A single sign-on provider must accept the new
redirect URL.
What a restore rolls back
| Change after the backup | After the restore | What you do |
|---|---|---|
| A server enrolled | Unknown to the console and the mesh. Its mesh traffic stops. | Enroll it again. A member of a service waits for Replace a server. |
| A server enrolled again with a new mesh key | The mesh has the old key. | Run Re-enroll command on the server again. |
| A service was created | It runs, but the console cannot manage it. | Contact Tiger Data support. Back up after changes keeps this window short. |
| A service or a server was deleted | The console shows it again. Its operations fail. | Delete it again. |
| A password, a setting or a license changed | The console has the old value. | Make the change again. Install the license file again. |
| A console backup target, schedule or recovery key changed | The console has the old values. | Make the change again. |
After any restore, every user logs in again. An operation that was running at the time of the backup shows as interrupted. Check the real state of the service before you run it again.
After the restore
Admins see the banner Restored from the backup of time. Select Open the checklist to open the After the restore card. The card lists unhealthy services and missing server packages. Dismiss removes the banner and the card for all admins.
Test each server
In the card, select Test each server. A server enrolled after the backup does not show or answer.
Check each service
On the Overview of each service, check that it is healthy. If not, use the matching runbook.
Load the missing packages
In Administration → Server packages, load the missing packages with
Upload server packages, or with --pack (see
Load server packages). A backup
without the Server packages tier has none.
Check the console backups
In Administration → Console backups, check the targets, schedules and recovery key. Make a backup and wait for its check to pass.
Make the later changes again
Make the changes from after the backup again.
Restore in place
You must be an admin. The console must have a confirmed recovery key: the restore first backs up the current state to it.
Select the archive
Open Administration → Console backups. In the Backups card,
select Restore on an archive. Or select Restore from a file, and
upload a .tse file of this console.
Paste the recovery key
In Recovery key, paste the key file or its AGE-SECRET-KEY-1...
line. For an archive on a target, the dialog names the fingerprint of the
key it needs.
Check the archive
Select Check the archive. The console does not keep the key.
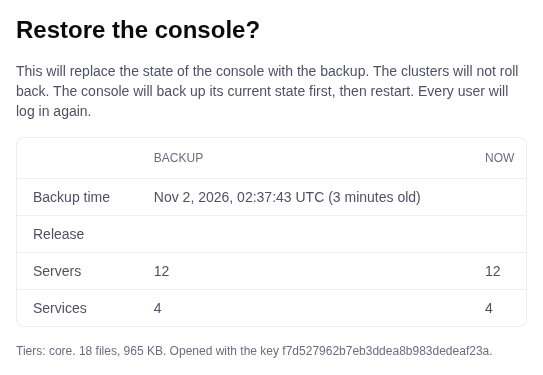
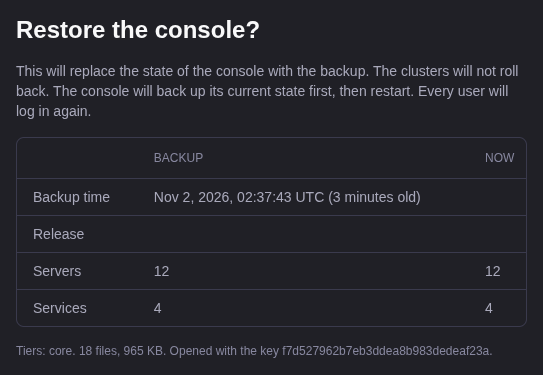
Read the summary
Read the summary and the table of what the restore rolls back. If the check fails, do not continue.
Restore the console
Type the name of this console, and select Restore the console.
The dialog shows The console is backing up its current state…, then The
console is staging the archive…, then The console is restarting. Log in
again when it is back. The current state goes to
<TSE_BACKUP_DIR>/pre-restore/ (the newest 3 archives stay). If that backup
fails, the restore stops and nothing changes.
The restart takes one to two minutes. The UI and the API are down. When the console is back, log in and complete After the restore. If it does not come back, follow Console outage.
Restore shows only on an archive of this console that is on its target and did not fail its latest check. The console refuses a restore in place:
- while an operation, a backup, an upload or another restore is running;
- of an archive of another console, of a newer release, or of a demo into a production console (or the reverse);
- when the archive has another
TSE_DB_ENCRYPTION_KEYorTSE_MESH_SUBNETthan.env. Use Restore on a new host on this host instead; - when the archive does not match its sidecar (size or SHA-256). Run Check on it, or restore another archive.
To undo a restore in place, copy the archive from
<TSE_BACKUP_DIR>/pre-restore/ to your computer. Restore it with Restore
from a file and the recovery key that opens it. Then complete
After the restore.